Ditching Cox Homelife: Porting Every Sensor to Home Assistant + Zigbee2MQTT
1. Cox Is Sunsetting Homelife — So I Took It Back
Cox announced it's winding down its Homelife home-security product. If you've been renting your smart home from a cable company, that's the moment you realize you never actually owned it — the sensors on your doors, the locks on your deadbolts, the motion detectors in your hallways: all of it was tied to a hub and a monthly bill that could disappear on someone else's schedule.
Here's the part Cox would rather you not think about: almost none of that hardware is special. The door and window contacts, the motion sensors, the deadbolt locks — they're all just Zigbee devices. The only thing "locking" them to Cox was the hub. Pull them onto your own Zigbee coordinator and they're yours.
So that's what I did. I rebuilt the entire system on Home Assistant (running in Docker) with Zigbee2MQTT and a Mosquitto MQTT broker. The alarm logic got rebuilt with Alarmo, and I wired up Noonlight for real 24/7 professional monitoring with police dispatch — so I didn't lose the one genuinely valuable thing Cox provided. But this post is about the part everyone gets nervous about: getting the physical devices to move over.
Spoiler: everything ported except the devices that were the most proprietary. The open stuff just worked. The locked-down stuff fought me — and one class of device never came along at all.
2. The Only Hardware You Need to Buy
You need exactly one thing to start: a Zigbee coordinator. I bought the SONOFF Zigbee 3.0 USB Dongle Plus-E (ZBDongle-E) — the kit that ships with a 1.5m shielded extension cable (which also kills the USB 3.0 interference these dongles are notorious for). It's an EFR32MG21, +20 dBm coordinator, and Zigbee2MQTT talks to it through its ember adapter. Plug it into the machine running Home Assistant, point Zigbee2MQTT at it, and you have your own hub.
Now the part I genuinely didn't expect:
A single dongle covered a 6,000 square foot house with no extenders, no repeaters, nothing.
Every piece of conventional wisdom tells you a house that size needs mains-powered Zigbee routers sprinkled around to extend the mesh. I was fully prepared to buy a couple. I never had to. Every battery-powered end device — contacts on the far side of the house, locks in the garage, motion sensors upstairs — connected directly to the one coordinator and reported reliably. Signal quality (LQI) stayed strong across the board.
Your mileage will depend on your walls (stucco and metal lath are Zigbee's enemies), but don't assume you need a pile of repeaters before you've tried. A single well-placed coordinator goes further than the forums lead you to believe. If you do hit a dead spot, one mains-powered router doubles as a range extender.
3. Door & Window Sensors — and the "Battery %" Lie
The Cox door and window contacts (Sercomm-made) paired into Zigbee2MQTT with no drama once I learned the reset dance. To join one:
- 1.Pop the cover off and pull the battery.
- 2.Press and hold the reset/tamper button for a full 10 seconds as you reinsert the battery. Don't wait for a blinking light — there isn't one. The LED comes on solid the instant the battery goes in, then goes dark, and that's the only feedback you get. So just count it out ("one Mississippi, two Mississippi…") or set a 10-second timer. If you don't hold it long enough it simply won't show up as discoverable — and nothing tells you whether you held it long enough, so err on the side of holding too long.
- 3.Watch Zigbee2MQTT interview it and expose contact, tamper, and battery entities.
The gotcha that cost me an hour: don't put the cover back on too soon
Two of my sensors — I'll call them "Master 1" and "Master 2" — kept half-joining and then vanishing. The interview would start and never complete. I blamed range, I blamed the battery, I blamed the sensor. It was none of those.
The cover on these sensors presses the tamper switch closed. And these are sleepy end devices — the moment they think everything's buttoned up, they go to sleep to save battery. I was snapping the cover back on the instant it powered up, which put the sensor to sleep mid-interview, before Zigbee2MQTT had finished inventorying it.
Leave the cover OFF the entire time the sensor is being discovered.
The moment I forced Master 1 and 2 back into pairing mode and left the lids off until Zigbee2MQTT showed them fully interviewed with all their entities, they joined perfectly. Only then did I put the covers back on. Same fix for both.
Ignore the battery percentage — it's meaningless
Here's a nuance that'll save you a lot of confusion: on these door/window sensors, the battery percentage is garbage. It'll report something like 16% on a brand-new cell and never move. It is not a real reading. If you build low-battery alerts off that percentage, you'll get phantom warnings forever and miss the actual dying batteries.
What you want instead is the battery_low boolean that these sensors also expose. That value is honest — it flips true when the battery is genuinely low. So in Home Assistant I ignore the percentage entirely and drive every low-battery notification off the boolean:
# Alert on the reliable boolean, NOT the percentage
- trigger: state
  entity_id:
    - binary_sensor.front_door_battery_low
    - binary_sensor.back_door_battery_low
    # ...every contact sensor's *_battery_low entity
  to: "on"   # device_class battery: "on" == low
Rule of thumb for the Cox/Sercomm contacts: the power indicator is meaningless — trust the boolean.
4. The Door Locks — the Relearn Sequence Nobody Documents
The deadbolt locks were the fiddliest, and the exact join sequence is not obvious from the app. There are actually three buttons inside — a Program button, a Button "A", and a Button "B" — and they do different jobs. Getting a lock to factory reset and join Zigbee2MQTT is a specific dance:
- 1.Remove the batteries.
- 2.Hold the Program button while you reinsert the batteries. This kicks off the factory reset.
- 3.Press the Program button again and let the relearn cycle run.
- 4.Wait for the relearn to finish — don't rush it.
- 5.Press the Program button once more.
- 6.Now press Button "A" four times. This is the step that actually puts it into Zigbee join mode — and it's easy to miss because it's a different button from the one you've been pressing.
- 7.The lock shows up in Zigbee2MQTT and completes its interview.
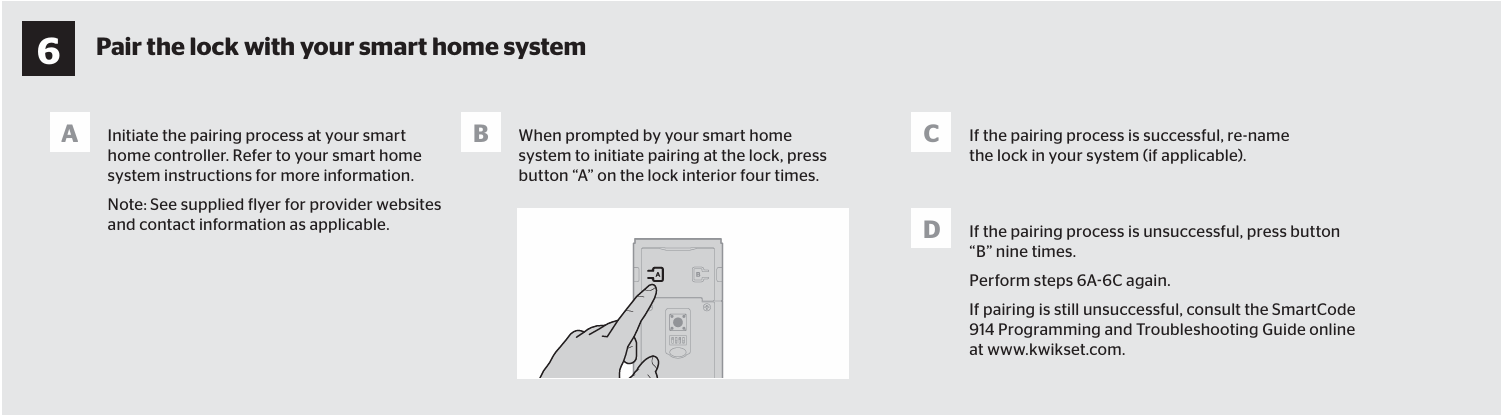
If the lock doesn't show up after four presses of Button "A", it needs a harder reset: press Button "B" nine times to reset it, then go back and press Button "A" four times again. That combination has always brought a stubborn lock around for me.
The lesson: the Program button is for the reset/relearn cycle, Button "A" × 4 is the join trigger, and Button "B" × 9 is your reset-and-retry escape hatch. Miss that Button "A" step and you'll sit there forever wondering why the lock reset fine but never appears in Zigbee2MQTT.
One place the battery reading is actually trustworthy
Remember how I said the door/window sensors lie about their battery level? The locks are the opposite — they report battery/power accurately. When a lock says 100%, it means 100%; when it drops, it's really dropping. So for the locks you can trust the percentage and alert on it directly. It's a nice reminder that "Zigbee" isn't one monolithic behavior — every manufacturer implements the battery cluster differently, and you have to know which of your devices are honest.
5. Motion Sensors — the Reset Is the Exact Opposite
Here's where muscle memory will burn you. After doing a dozen door/window sensors — where you hold the reset button for ~10 seconds — I assumed the motion sensors worked the same way. They don't. The motion sensors are the opposite:
- 1.Put the batteries back in (while holding the tamper).
- 2.The green light comes on almost immediately.
- 3.Release the tamper button as soon as that light comes on — the instant you see it, let go.
That's it. On the door/window sensors you hold; on the motion sensors you release the moment the light appears. If you hold the tamper down the way you did for the contacts, nothing happens — you just get the solid power-on light and then it goes dark, and the sensor never enters join mode.
This one tripped me up hard. I sat there holding the tamper "just like the door sensors" and watched it do absolutely nothing over and over. The fix was counterintuitive: stop holding, and release the instant the green LED lights.
6. The One Thing That Refused to Come Along: the Garage Door Sensors
Everything above ported. Then I hit the wall: the two garage door sensors would not join, no matter what I did. And their failure is the most interesting part of this whole project, because it perfectly illustrates why vendor lock-in is the actual enemy.
These were older, more proprietary units (a legacy Visonic design). In Zigbee2MQTT they'd join, start their interview, and then — about five seconds later — drop right back off the network. Join, leave, join, leave, in an endless loop:
Device '0x000d6f...' joined
Starting interview of '0x000d6f...'
  genBasic.read(modelId)          -> Status 'UNSUPPORTED_ATTRIBUTE'
  genBasic.read(manufacturerName) -> Status 'UNSUPPORTED_ATTRIBUTE'
Interview failed: TypeError: Cannot read properties of
  undefined (reading 'manufacturerID')
Device '0x000d6f...' left the network
...repeat forever
I chased every red herring first — range (signal was excellent, LQI over 200), battery (the radio talked fine), a corrupted database entry, even whether the units were heat-damaged from sitting in a 100°+ garage. None of it. It worked on Cox the day before; the hardware was fine.
The real cause is right there in the log: when Zigbee2MQTT asks the device for its modelId and manufacturerName — the standard attributes every compliant Zigbee device is supposed to expose — this one answers UNSUPPORTED_ATTRIBUTE. It literally refuses to say what it is. Without a model to match a driver, the interview code throws, the pairing aborts half-written, and the device bounces off the network. Both garage sensors did it identically, so it wasn't a bad unit — it's the model.
The devices that wouldn't port were, without exception, the most proprietary ones.
Every open, standards-respecting Zigbee device in my house — the contacts, the locks, the motion sensors — announced itself honestly and dropped right in. The one device that hid its identity is the one that couldn't come with me. That's not a coincidence. That's the whole lesson of getting off a walled-garden platform.
The fix is refreshingly boring: I replaced the two stubborn units with off-the-shelf ThirdReality Zigbee garage door tilt sensors ($19.99 right now), which pair with Zigbee2MQTT instantly and report a clean model ID like every well-behaved device should. For a garage door, a tilt sensor is the right tool anyway — it reads the door's angle instead of fighting a contact gap on a rolling door.
7. Stop Renting Your Smart Home
When Cox announced the Homelife sunset, the "easy" path was to sign up for whatever the next monitored, subscription-locked, hub-tied product was going to be — and hand over control all over again. Instead, I spent a few evenings pulling every sensor onto hardware I own, running software I control, in a config I keep in my own git repo.
The result:
- •One SONOFF dongle covering a 6,000 sq ft home with no repeaters.
- •Every door/window contact, deadbolt lock, and motion sensor ported over — no new hardware except two garage tilt sensors.
- •The alarm rebuilt in Alarmo, and 24/7 professional monitoring with police dispatch via Noonlight — the one Cox feature actually worth keeping.
- •No monthly hub fee, no vendor who can brick my setup with a firmware update or a business decision.
The only thing that gave me real trouble was the one device engineered to be a black box — and even that was a $30 fix, not a dead end. Meanwhile MyQ (my garage opener) is a perfect example of the same disease: they deliberately blocked the Home Assistant integration, so I don't give them a status-integration role either. A dumb tilt sensor tells me if the door is open; nobody can take that away with an API change.
Your smart home should answer to you, not to a cable company's roadmap. The hardware is already yours — go take the software back too.